TLDR Go Straight to the How To

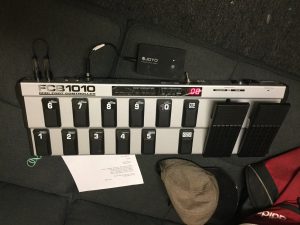
Notice anything missing? Those pesky wires!
In an effort to greatly expand the power of my 1 wire FRFR setup (and so that I could control REAPER on windows), I wanted a bigger pedalboard, but I wanted to keep it wire free. That meant some sort of wireless and some sort of battery power, and in the case of the batteries, I wanted to make sure it was both rechargeable AND had more than enough capacity to make it through a show.
The iRig Blueboard that I was using with the iPad wasn’t listed as Windows compatible (though, as you’ll see below,that’s not 100% of the story. It certainly didn’t have as many switches as I wanted, but it certainly fit the wireless and battery powered part.
There were a few choices that looked cool to me, the battery powered MIDI Mongoose from Tech21, though it didn’t have many switches either. Roland FC200 had lots of switches and built in expression pedals,and was battery powered, but long out of production and hard for me to find, the newer FC300 had lost a lot of switches and was quite expensive.
The choice looked better and better to be the ubiquitous Behringer FCB 1010. It was neither wireless, nor battery powered, but it was cheap, available everywhere and had lots of switches and two expression pedals
So first I had to battery power this thing. There were a few articles out there showing that for the most part, it only required 5vdc, but it had problems when running from a powerbank. I saw lots of articles on how to add a regular adapter, and Eureka’s mod page showed that ac or dc would power it from 5-12 volts. A lot of the mod pages showed applying power right at the regulator, either input or output side, but that felt sketchy to me, especially if the power was over 5volts.
Most of the literature I could find showed 10v coming out of the transformer and 5v coming out of the regulator, so I figured my best bet was 9v. Which also hinted at why the Rolands used 6 double A’s. A regular 9v battery doesn’t have much capacity, but 6 AA’s sounded like a pain in the ass to keep recharged. I asked around, and got a lot of advice on the REAPER forum. I eventually stumbled upon the Joyo JMP-01 and picked it up from cheaperpedals on Reverb for 70 bucks.

This little guy claims 6600mAh, and at the dimension I was most worried about, was around 3 inches. I figured I’d velcro it to the pedal board and install a DC jack to plug it in.
There were lots of other good looking and way cheaper battery banks out there, but shipping them to Hawaii is EXTREMELY difficult.
Update: I received a Kuncan 5v to 9v USB adapter cable thing and it worked fine with a regular USB powerbank, so there is another, cheap way to go, you could probably find a way to mount everything inside and do some nice pretty, hidden charging. Just need to find a way to view the charge indicator if it has one. Here’s the one I used. https://www.amazon.com/KUNCAN-Converter-Step-Voltage-2-1mm/dp/B01ID90E3C
Here’s a test of it
The wireless on the other hand…youch.
Panda seems to have probably the best bet for me with their MIDI Beam. This says to be windows compatible, and would be trivial to power with the Joyo alongside the pedalboard. Unfortunately, its also over 200 bucks.
I went with the Yamaha MD BT-01

I’m not really sure I need the bidirectionality, but it doesn’t need its own batteries and its cheap
On the downside, it is listed as not Windows compatible. But I figured, if all else fails, I can bug Justin Frankel till he figures something out. Windows now supports Bluetooth LE, so its gotta at least talk to this thing, let’s try it!
Since my computer didn’t have bluetooth, I ordered a Pluggable Bluetooth adapter

Update: today I got a CME WIDI Bud. It shows up as a MIDI port in REAPER, and the lack of latency is INCREDIBLE! This is probably the best way to go so far.
Testing the Widi Bud:
As soon as all the junk arrived, I started drilling holes in the pedalboard. First was to drill two holes under the expression pedals to that I could put in toe switches for activating wahs and things, since unlike Tonestack and AXE FX-II, the wahs I was looking at in VST could not auto engage. I wired these switches into switches 9 and 10 on the pedalboard, bummed that I was losing two pedals, but I figured it was a necessary evil.
However, thru parameter modulation in REAPER, I was able to kludge togther a sort of auto engage, so I ended up removing this mod….but PLEASE
PLEASE see this thread,
If you can make this particular JSFX, we would be most appreciative!!!
Basically, this would send a switching value when given an input from the same CC controlling the wah, in order to turn the wah on and off upon being moved off of rest
my psuedocode, sort of:
Sliders:
inCC // the cc# you want as a control
outCC // the cc# you want to send the output date to
threshold //checks the level of inCC. If inCC <=10 then outCC sends 0 to the cc# specified in outCC.
//IF inCC > 10 then outCC sends 127 to the cc# specified in outCC.
Sorry for the digression, but I think this would be a GREAT enhancement to MIDI control in REAPER
Update, this JSFX has been made! And then some. There was a ton of programming to do to get the very very most out of this system inside REAPER, which will probably be another article, but more on that later: Thanks to Michael Schnell and mpl!
https://forum.cockos.com/showthread.php?t=202857
Next I drilled a hole for the power jack and ran a wire from it to the input side of the regulator. I plugged the Joyo in, saw it flash a few times then turn off. Looking closer I realized that the Joyo was + on the outisde, – on the inside. Whoops, I had it backwards! Hopefully I didn’t fry anything!!! I reversed the jack wiring and tried it again. The Joyo flashed a few times then turned off. Bummer.
I plugged a 9vDC adapter in, just in case, and the pedalboard turned on for a bit! When I hit a pedal, it turned back off. It seemed quite intermittent, but sometimes it would fire up and sometimes not. Not looking good.
I plugged the regular A/C cable in to see if at least that worked, and joy of joys, it turned on and worked fine!
So I turned it off and plugged the 9v back in, but no lights :(, So of course you know what I did next, flip the main unit switch.
Whoops, now nothing would turn it on. Turns out there was a fuse at the mains input, and sure enough it was blown. Also sure enough, this being Hawaii, all the shops are closed early, and the chances of anyone having the required 3/4″ 100mA fuse were nill.
So in for a penny, in for a pound, if this thing was fried, I was going to fry it further. I tried a 12vDC adapter, and lo and behold, it worked perfectly! And then when I tried the 9v adadpter, that worked too…here I am thinking maybe it has to charge up some capacitors.
By morning time, I went to all the shops, unable to find a suitable fuse. I started yanking apart gear around the school and found a 500mA 3/4″ fuse in a dead computer, stuck it in, and was overjoyed to see that the FCB 1010 still worked on the mains!
In order to foolproof the pedalboard from my fool self, I decided to put in a DPDT on/off/on switch so you could chose between mains power and adapter/battery. When I went to test the switch, set it to A/C mains, worked fine. Stuck the 9v adapter in, no go…wait what? Tried the 12volt again and it worked…I questioned whether the switch was eating power, or if something was shorted, so I took the pedalboard apart, for probably the 20th time.
And then it hit me. What if the insulated DC jacks I ordered weren’t actually insulated? I pulled out my multimeter and checked continuitiy between the jack and the pedalboard’s case…
BEEEEEEEEEEEEEEEEEEEEEEEEEEEEPPPPPPPPPPPPPPPPPPPPP!!!
Aha!!! I took some old little rubber feet, drilled them out, put liquid tape all over the jack, and hot gluegunned the jack inside the LRF and then gluegunned the LRF to the pedalboard.
12volt worked
9volt worked
Joyo worked!!!
I got on the computer and ordered some new fuses and some (hopefully for real this time) insulated power jacks from….not sure if I’ll get blacklisted for using the words, so, from here
Hopefully they work, I will update once I find out.
Update, I got the new insulated Jacks in and they are BEAUTIFUL!
I figure I will just velcro the Joyo to the pedalboard someplace, or maybe hot glue it, but when I get the new jack in, I may try and mount it inside the pedalboard. Some of you smarty pants out there may find a better battery pack that you can stick inside, wire the charging port to a jack on the outside of the pedalboard, and maybe drill a hole for its power switch and battery charge indicator lights. That would be way better, but I’m happy with this as it is.
I haven’t been able to determine how long the charge lasts. I had it on with the wireless for about 3 hours while I was programming the pedalboard and REAPER and SWS Live Configs (and oh boy will that be another, long and painful article) and the light was still green. I had it on and off for a total of about two hours today and its still green, I guess I’ll just leave it on overnight and see what happens. If I could find a switch to turn off the pretty much useless LED’s on the pedalboard, I bet it would last way longer.
Now onto the wireless.
I installed the Pluggable bluetooth drivers, no problems there.
I stuck the wireless MIDI jacks into the pedalboard, flipped the pedalboard on and got a flashing “8.8” on the FCB’s LED display. Looking it up I found a but about that on the Uno page, which said to hit any pedal and then ignore it. But of course, I tried powering up the board without the MIDI out connected and lo and behold, no flash, plugged the MIDI out in and all was still good.
Not sure if that will end up blowing up the MD-BT01, so, do that at your own risk. Yamaha says to plug them in before powering up the pedalboard FWIW
In windows settings, I went to “Add new Device”, chose Bluetooth, and saw the wireless show up so I paired them. All good there.
Opened REAPER, went to MIDI devices and….
nothing.
After some googling I saw mention of something called MIDIBerry in the windows app store for free
I installed it and it saw the wireless, I hit monitor, moved some pedals and YAY!!!! Numbers came flashing by!
Opened REAPER, went to MIDI devices and….
nothing.
BARF!!!
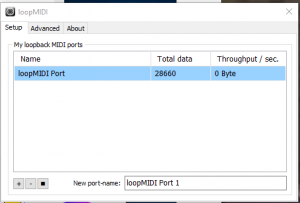
More Googling and I found a virtual midi driver(I think) called loopMIDI
I installed it, opened up MIDIBerry and was able to select the loopMIDI port thing
Opened REAPER, went to MIDI devices and….
SUCCESS!!!
REAPER sees it, lets me control it and, hell yeah, wireless, battery powered MIDI!!!! Ten switches and two expression pedals! YAY!
MIDI latency seems to vary, sometimes it seems to be nonexistent, sometimes its horrible. Sometimes, if MIDIBerry isnt focused, you lose MIDI. If MIDIBerry is minimized, you lose MIDI. If you turn monitoring off in MIDIBerry, sometimes you lose MIDI
I think we would be WAY better off if we had native Bluetooth LE support inside REAPER. and I’m betting it would be even better than others since Justin or Schwa would likely be doing it. AFAIK, Sonar, even on its last legs, has added this, so I think its doable.
Please, I implore you, do one or both of the following
1: Add your voice to the Bluetooth over MIDI Support in REAPER thread at the REAPER forum
2: Ask Justin for Bluetooth MIDI support in REAPER at AskJF
I may also later give the Panda MIDI Beam a try, we shall see.
Update, picked up the CME WIDI Bud and it is easy as pie now! REAPER sees it as a MIDI port, and the latency is nonexistent to me, same as plugging in a midi cable.
And now, after that excessive windbaggery and verbiage,
The How To
Again, ALL of the below is AT YOUR OWN RISK
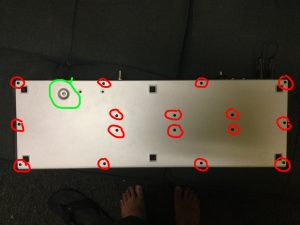
Step 1: Take out the screws inside the red circles

Step 2: Once you get the cover off, you might want to take out the screw in the green circle. Be sure to wtach that you don’t drop the nut or the washers someplace you can’t find them, or where they might short things out
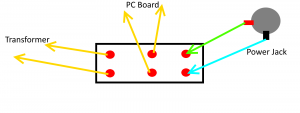
Step 3: Cut the two yellow wires inside the red circle. Cut somewhere way in the middle so you have room to work, you will likely need to add some length to these wires

Step 4: Drill a hole someplace smart and get ready to stick a DPDT switch in the hole.
Step 5: Wire the two yellow wires coming from the transformer side to two of the outside pins of the DPDT switch
Step 6: Wire the two yellow wires going to the PC board to the two center pins of the DPDT switch
Step 7: Drill a hole for the power jack someplace smart in the FCB’s case.
Step 8: Be DAMNED SURE to find a way to make sure the power jack is NOT shorting to the case or internally. Check with your multimeter
Step 9: Be DAMNED SURE to find a way to make sure the power jack is NOT shorting to the case or internally. Check with your multimeter
Step 10: Wire the two terminals of the power jack to the two outside pins of the DPDT switch, opposite from the pins you wired the transformer output to

Step 11: Use a magnet or compressed air to get rid of any shrapnel from the drilling process, being very careful to get rid of any metal that could short out any of the internals
Step 12: Screw in and secure the DPDT switch. Make sure it is well insulated from having any of the terminals touching anything. I suggest aligning the switch so that when you select AC Mains power, the switch lever points at the mains cable, and when you choose battery power, the lever points to the power jack
Step 13: Screw in and secure the power jack
Step 14: Be DAMNED SURE to find a way to make sure the power jack is NOT shorting to the case or internally. Check with your multimeter
Step 15: Switch to mains power, flip it on and see if it works
Step 16: Switch your DPDT switch to the center position, I suggest for now, unplugging the AC Mains cable as well
Step 17: Plug your battery in and switch the DPDT to battery power. Check if it works
Step 18: Figure a way to secure your battery to the unit, and definitely let me know if you come up with something clever!
Congratulation! No more A/C cable when you don’t feel like plugging one in!
Now onto the wireless
Step 19: Plug in your Wireless jacks, making sure to mind the arrows printed on the jacks to go to the correct jacks on the pedalboard. I am going to use some different colored nail polish or paint to make this more obvious for mine
Step 20: Download and install loopMIDI from here
Step 21: Open loopMIDI, go to the setup tab and click the plus button at the bottom so that you see a MIDI port

Step 21: Download and install MIDIBerry from here
Step 22: Go to windows settings and pair your MIDI wireless in Bluetooth
Step 23: Open MIDIBerry, for input click on the wireless, for output, click on the loopMIDI port, which will be named “MIDI” whatever random number it assigned in the loopMIDI window
Step 24: Click your wireless in the input window again, turn monitoring on and move your pedal to confirm you are receiving MIDI
Step 20-24 updated: Get a Widi Bud from CME, install the Widi Plus program from CME, run it and pair your Wireless adapter, close Widi Plus
Step 25: Open REAPER, go to Preferences then MIDI Devices, right click on “loopMIDI Port” in the input device window and enable it (enabled or control only or enabled + control depending on what you are doing with it), hit apply and then OK
Step 26: Assign MIDI to stuff in REAPER and try it out! Congratulations, you got wireless MIDI in REAPER!
Step 27: Add your voice to the Bluetooth over MIDI Support in REAPER thread at the REAPER forum
Step 28: Ask Justin for Bluetooth MIDI support in REAPER at AskJF
Step 29: See if you or someone else can make a JSFX for auto engage, see this thread for details
Leave a Reply