With Positive Grid teasing us on Instagram about a big announcement coming for iPhone, and what always seemed to me to be a dearth of specific information about just how to do it, I figured I would write a step by step how to guide on setting up Bias FX on iOS.
The goal of this tutorial is to end up with a versatile live setup, under MIDI control.
Due to the sparse development of audio in general on iOS, there are a lot of issues we have to find workarounds for, but I really think we can end up with an extremely portable, yet extremely powerful guitar rig. But please keep in mind, as we hit walls and pitfalls, there are many different ways to skin this cat, and I am showing one possible way to get through this journey.
Hardware:
For this particular example, I have chosen a hardware setup that is readily easily available, and that I have done enough testing on to confirm that it will behave decently.
iOS Device: iPad Air2. This particular device provides more than enough power for my needs, and previously I had used a Mini 2 which is far less powerful, yet still ran everything here. I suppose an iPhone SE would be quite strong enough, if only PG would release Bias FX on iPhone (oh wait?)
MIDI Pedal: Behringer FCB1010. There are tons of other devices out there that will work for this including the iRig Blueboard. For my needs, I wanted a lot more switches, and having the onboard expression pedals is nice. In this case, I converted the FCB1010 to be both wireless and battery powered (more about this here: Building a Wireless, Battery Powered FCB1010). There is one more mod involving the wah which I will detail below, which could be totally avoided if Positive Grid decides to add Auto-Engage to their wahs and other relevant FX blocks (like the whammy pedal for instance)
Interface: Sonoma Wireworks StudioJack Mini. There are many other options here such as the iRig HD2, or Sonoma Wireworks’ other device, the GuitjarJack Stage, which is also a MIDI controller!
Speaker: Alto TS210. This is a basic, very low cost, very light weight FRFR powered speaker, other popular options are the QSC K series and the Yamaha DXR10. You may want to add a DI box to these in order to send also to the PA without worrying about any possible phantom power damage. One thing to consider, if your FRFR has XLR outs, is whether or not their onboard volume controls will affect the level going to the PA. Probably one more argument for a DI box. I detail using this particular speaker into a conveniently mobile setup here: iOS One Wire Setup!
Issues
Switching time.
This is a biggie. Last year, LBX, MPL, Daniel Perry, I and quite a few others around the REAPER community and the Positive Grid pages spent a great deal of time creating different schemes between snapshot switching, crossfading, and caching to come up with instant, glitch free switching using a wide variety of VST plugins, DAWs, scripts and other tools. These are all computer based, though some of this research did result in Juce code which has been offered to Positive Grid and could at least in theory be applied to the iOS version of Bias FX. As it sits, for many peoples’ purposes, switching between presets is just too slow for onstage use, and another way will have to be used, which luckily, Positive Grid has provided for us, though it has some caveats.
Dual output paths for guitar amp vs PA system/FRFR.
This is a big problem, and in the way I’m describing it, there will ONLY be an output suitable for FRFR. There is a way to use dual paths in Bias FX by putting a cab on one Amp path and not putting one on the other, but since we are using path switching to deal with the switching time problem, this will not be available to us. A floating Impluse FX block could fix this, as could treating the left and right outputs differently in the global menu, but sadly, these are only wishes for the future and not the reality of today. As an extreme case, you could stick a Mooer RADAR or something on the FRFR output and leave the cabs off the amps, but that would destroy our simplicity. Running another app thru Interapp Audio might possibly help, but this brings up the unreliability factor by orders of magnitude. Much more about the Dual Path Philosophy Here
Wah switching.
Unlike a lot of its competitors, Bias FX does not have Auto Engage for its wah FX. Most MIDI pedals out there have no switches under the expression pedal to allow you to switch manually either, so you have to chose between a variety of decent, and not so decent workarounds.
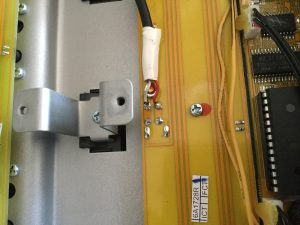
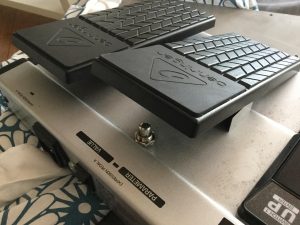
In my case, I drilled a hole under one of the expression pedals and stuck in a momentary action SPST pushbutton switch. The other end was soldered to the switch of pedal #9. This means that I had to give up one of the FCB1010’s switches, but on other MIDI pedalboards, if it has a second CC input, you may be able to use that instead (still auto engage would be much, much cooler!)
Preset Setups
Switching is too slow from preset to preset, so switching between dual paths is the way we will go here. Hopefully, in the future Positive Grid will adress this with a snapshot switching scheme or possibly some more options dealing with crossfading or caching.
By path switching, I mean we will insert the splitter FX block which also adds the Mixer FX block, and allows for two amp paths, and then toggle between path 1 and path 2 with a footswitch, allowing an instant switch between clean and distorted sounds. The downsides of this arrangements are, in most cases, not being able to use simultaneous dual amplifier models, and much much worse potentially for a live situation, losing the ability to have a signal with the cabinet ON for the PA system and FRFR speakers and a cabinet OFF signal, for regular guitar amp inputs. This really does need to be addressed, but for this article, we will just assume you are using an FRFR speaker.
MIDI Pedal Setup
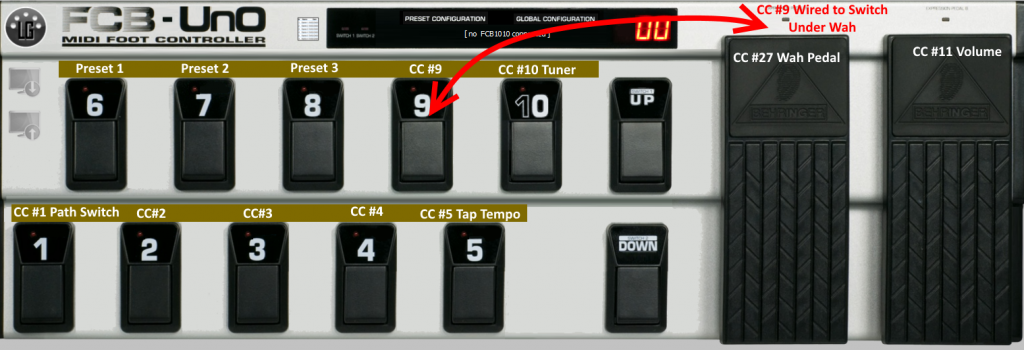
The first thing I like to do is figure out roughly how I would like my pedalboard setup. Usually with the FCB 1010, I like to have presets on the bottom row, with stomps on the top, but given the amount of time it takes to switch presets in Bias FX iOS, we’re using path switching instead, so I will be putting the presets on the top row. I also want tap tempo and a dedicated pedal for the tuner. Also, one of the pedals had to be given up for the wah switch as detailed above (please please please, Positive Grid, give us Auto-Engage!).
Word to the wise, while you are setting this up, try not to get super frustrated that documentation for the Positive Grid stuff is EXTREMELY hard to find. My Google Fu is not weak, but a lot of the answers to basic questions will be elusive.
So my basic layout will look like this
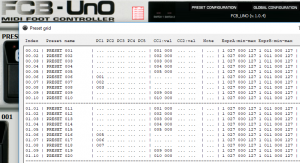
Here is a capture from the pedalboard editor screen, yours will look a bit different depending on the editor you use.
In this case, each bank has three presets, which are the first three pedals on the left of the top row, with Bank 1 having presets 1-3 and Bank 2 having presets 5-7. Due to the way Bias FX’s preset to MIDI PC works, numbering it this way makes life a lot easier for me.
The fourth pedal on the top row (pedal 9) is wired to the pushbutton switch that I wired in underneath the first expression pedal. In this way either that fourth pedal or the pushbutton will send, in this case, CC #9 which I will be using to toggle the wah on and off.
The last pedal of the top row, Pedal 10, is set to CC #10, which will call up the tuner in Bias FX.
The bottom row of pedals is set from CC #1 to CC #5 in that order. Pedal 1 controls the Splitter Switch in Bias FX to switch between amplifier paths. Pedal 2, 3, and 4 are meant to control stomps in each preset. You can even set a single pedal to toggle more than one FX block in Bias FX, which will really, really come in handy, and actually gives you some of the benefits you would find were this a snapshot system.
Bias FX MIDI Setup
Getting Bias FX to listen to your MIDI pedalboard can be quite tricky.
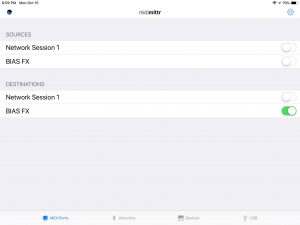
In my case, using the wireless MIDI setup, I need to use an app in between my pedal and Bias FX called midimttr. Once the MIDI pedal was paired to the iPad in the iOS settings, I set midimttr to look like this
In Bias FX, click settings, then “MIDI Setting”, then switch “Enable MIDI Control” to the on position. Then click “MIDI Channel” and chose “All Channels” or whatever channel you want to listen to.
Building the Presets
For this first bank, I would like a clean preset, a distorted rhythm preset, and a heavily effected, distorted lead sound. Given the MIDI control available to us, what I will really be doing, is creating a preset that can switch between all of these things, and simply set each preset into the desired state and save it that way. As you play more and more with each of these, the individual presets will likely evolve to become quite different than the generic master preset, but its a good way to start.
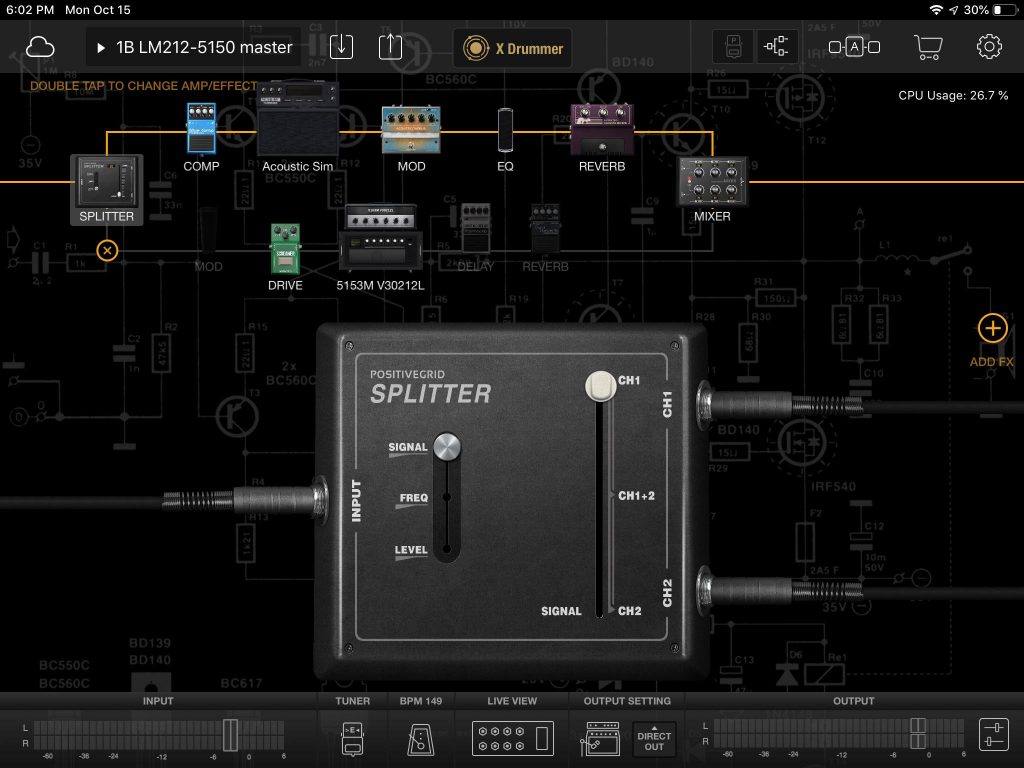
So here are some screenshots of the basic preset I’m setting up here, which will be available on the cloud
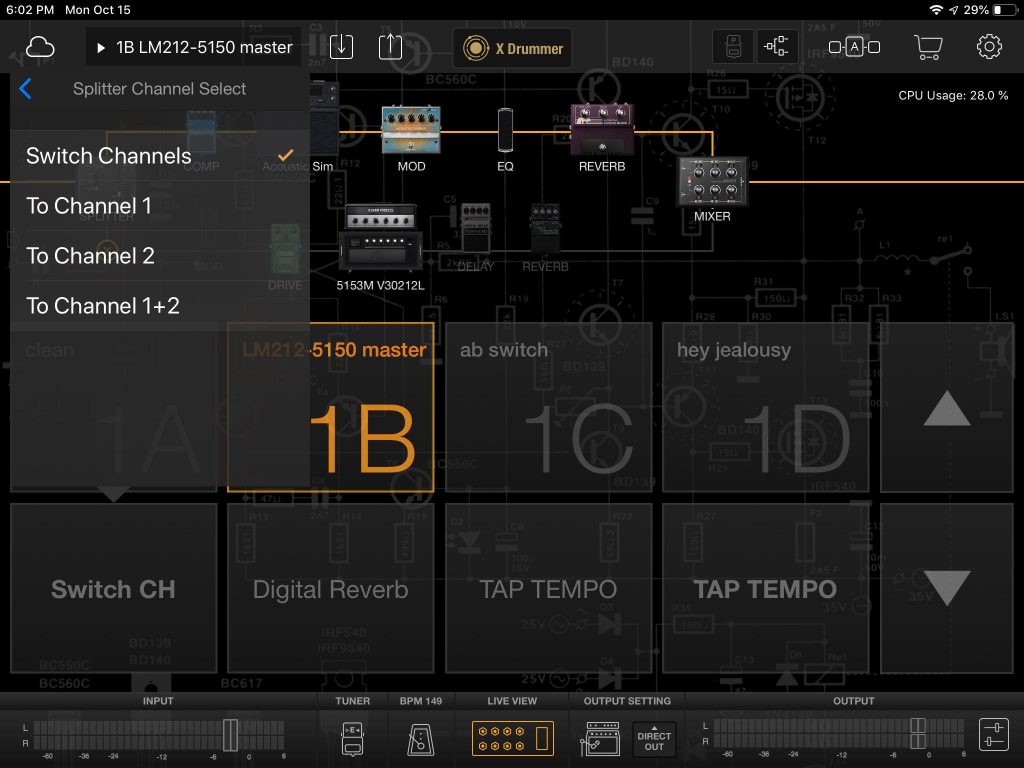
In this example, I have a clean sound on the top path, and a distorted sound on the bottom path. The paths are chosen by switching the SPLITTER between CH1 and CH2. In order to set this up, hit the “LIVE VIEW” button at the bottom of Bias FX. Long press the bottom left button of the LIVE VIEW pedalboard, then press “Splitter Channel Select” then chose “Switch Channels” as shown below.
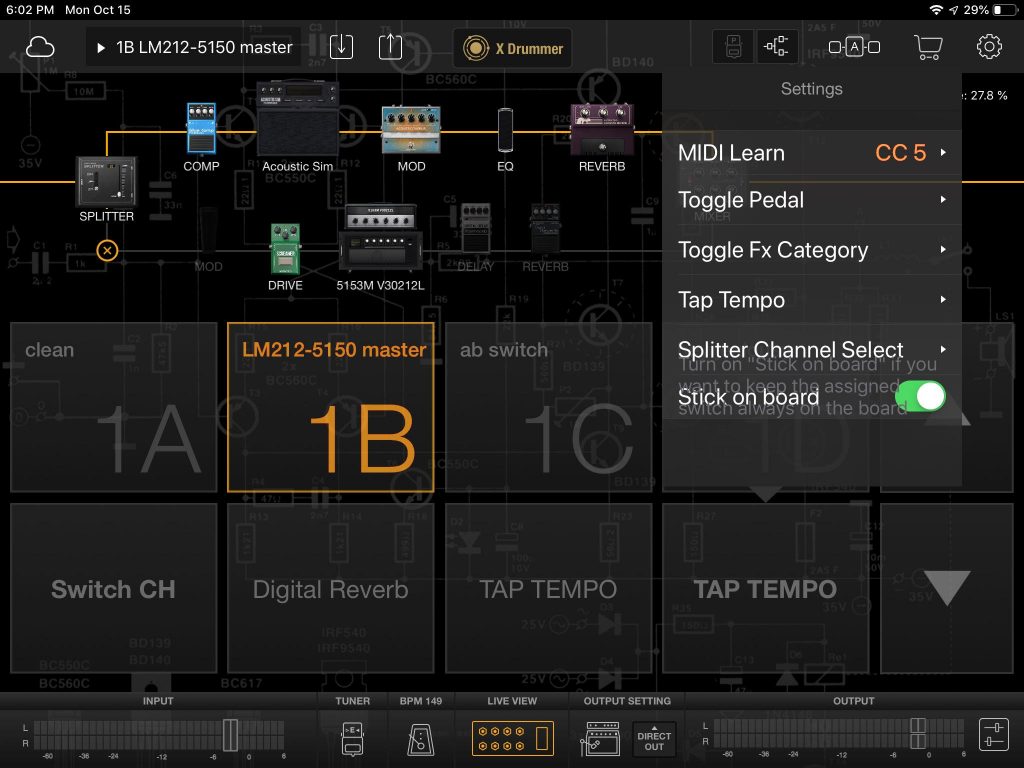
Now to assign MIDI CC #1 to the splitter, hit the back arrow, then click “MIDI Learn”. Either press the pedal you want to use on your MIDI pedalboard (which frustratingly often does not work) or click the “- +” buttons until you get the MIDI CC number you want. Hit the back arrow and test it out!
Next, while the LIVE VIEW is still showing, set up the tap tempo, by long pressing another one of the bottom buttons then click “Tap Tempo”. Assign it to the desired CC# as you did above, by clicking MIDI Learn. In my case, I am using CC #5. Also, as shown in the picture, you may want to enable “Stick on Board” as shown in the picture. I am reasonably sure that this keeps the Live View assigned this way even when you change banks.
Next on the agenda, let’s get the tuner assigned. Its probably now a good time to talk about the ways that Bias FX lets you assign MIDI control. There seem to be three ways:
- Long press on the “LIVE View” buttons
- Long press on knobs or switches of the FX icons in the regular view
- In Settings, MIDI Setting, MIDI Control Assignments
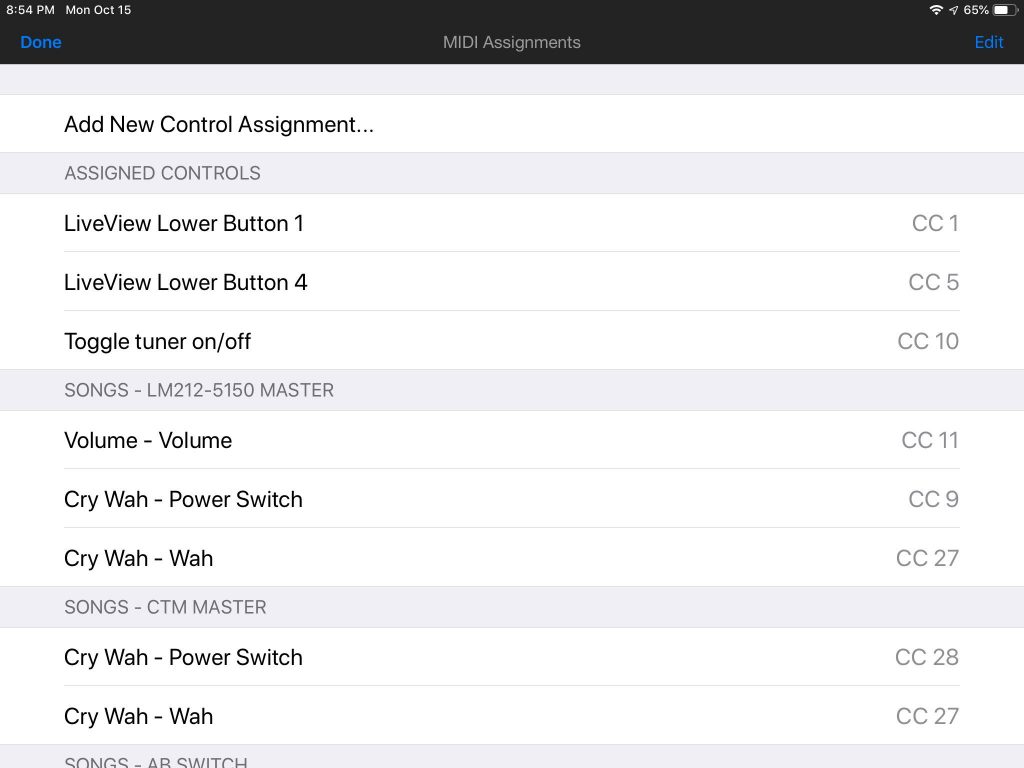
You would assume that #3 would show you an overview of all the assignments, but you would be wrong. Here is my assignment screen currently
As you can see, some assignments go to what seems to be a global position at the top, and others end up in a per-preset assignment. I have written to Positive Grid a few times to see if there is a way to explicitly chose which ones go where, or if there are any rules to it, but AFAIK I haven’t gotten a response to this yet. Keep in mind that you may have MIDI controls assigned, that do not show up here. Also, a big gotcha shows in that, just like in the desktop version, not all assignable things are actually assignable in all three places. Some things can only be assigned in Live View, some can only be assigned in MIDI Assignment view, etc. This can be very confusing, and should probably, honestly be worked on by Positive Grid!
Back to setting up the tuner. Use method #3 by going to Settings/ MIDI Setting/ MIDI Control Assignments and chose “Add New Control Assignment”. Click “Utility” and chose “Tuner” which will bring up a MIDI CC assignment screen. Here you can attempt to MIDI Learn the CC or just chose the one you want directly.
Next lets get to some stomps! For my lead sound, I would like a delay and a reverb, and I’d really like them to turn on or off at the same time. Let’s take a look at how to do assignment type #2. On the distorted path, chose the delay pedal icon, and when it shows up in zoomed in mode, long press its power button. Either enter the CC manually in the menu that comes up or attempt to MIDI Learn it. Do the same thing with the reverb pedal. Ensure that they are both either in the on state or the off state (though you can use this same technique to countr-toggle FX as well) and give your pedal a press! They should switch in and switch out as a unit, giving you some of the benefits of a snapshot system, or a MUCH faster preset switch, without having to do a major tap dance on your pedalboard!
Again, BE AWARE, that using #2 to do this may result in the assignment not showing up in MIDI Assingment View, but will still work. Again, Positive Grid should really address this.
Now assign the wah. You can use method #1 or #3 for the toggle switch. And yes, it is a toggle, not a directly on or off, which is an issue that can make some serious trouble, and should eventually be addressed by Positive Grid. In our case, it shouldn’t really give you any grief, but Bias FX Desktop, when used in a host DAW, can have serious issues with this paradigm. In my case, I have used the CC# for the pedal, and the switch wired underneath my first expression pedal, which is CC#9.
Get the Wah pedal assigned next, using either method #2 or #3. In my case, I am using CC #27. On this preset, I also have a volume pedal on the clean path, which I have assigned to CC #11
Assigning the Presets
As briefly mentioned earlier, for this first bank, I wanted a clean sound, a distorted sound, and a more effected lead sound. For the clean sound, simply switch to the clean path of the base preset and save it as “Clean”, for instance, to preset 1B of your current bank.
Be aware that the preset system seems to map from PC #0 rather than PC #1, so if you are using PC 1, PC 2, and PC 3 on your pedalboard, you would want to save your three presets to 1B, 1C and 1D.
For the distorted sound, switch to the distorted path and save as “distorted” to preset 1C
For the effected sound, turn on the reverb and delay, and save as to preset 1D.
Congratulations! You now have a pretty versatile, and controllable live sound setup!
The preset this is all based on is available on the cloud as
“LM212-5150 master” under “Aaron Carey”
It would be nice to see a few of these issues dealt with, a workable dual output system (cab off for guitar amp sends, cab on for FRFR/PA system sends), wet/dry controls for relevant FX, a real harmonizer, and of course auto-input, but this is DEFINITELY a workable setup, and now that there’s an iPhone version, its amazing that the brains of it can fit in your pocket!
great article, I wish i could get midi to work with my BOSS gt-3. I love Bias FX. The tones are excellent.
Good stuff in here!
But in my phone using your present, it does not appear in the live view the four buttons you have ( Switch CH, Digital Reverb, TAP TEMPO, TAP TEMPO ). Only shows me DRIVE, MOD, DELAY, REVERB . Therefore i can´t Long press the bottom left button of the LIVE VIEW pedalboard, and press “Splitter Channel Select” then chose “Switch Channels” as you say.
btw, new Bias FX user…
Have a look to THE [C] CONFIG (coming soon !)
https://youtu.be/WNbN8k1Zr4I